> For the complete documentation index, see [llms.txt](https://help.connected.illumina.com/llms.txt). Markdown versions of documentation pages are available by appending `.md` to page URLs; this page is available as [Markdown](https://help.connected.illumina.com/dragen-stratamap/illumina-stratamap-image-tool/image-processing/refine-tissue-masks.md).
# Refine Tissue Masks
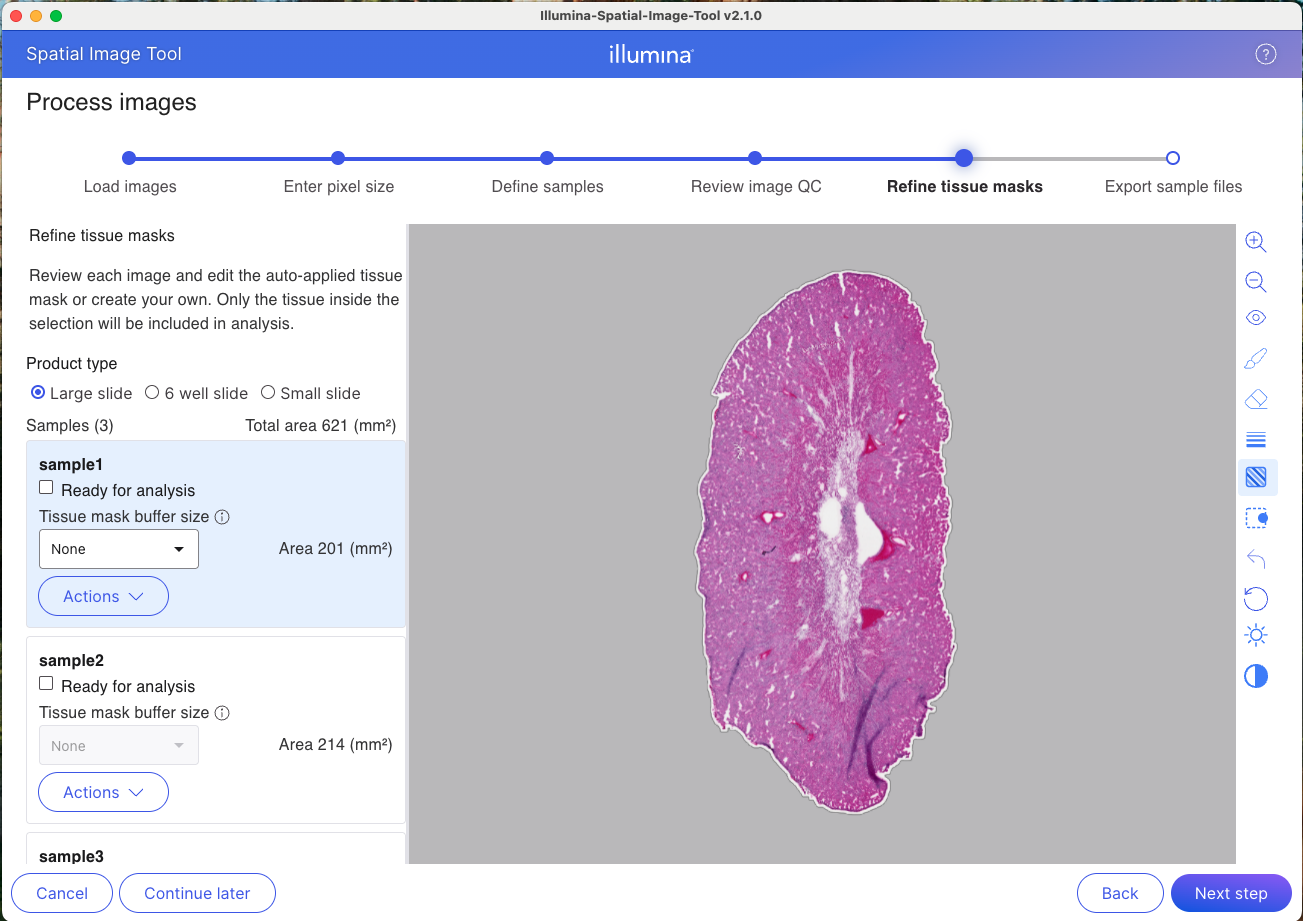
The Refine tissue masks screen is the fifth step in the image processing workflow. This screen is used to review and edit the tissue mask. Only area in the mask selection will be included in analysis.
### Auto-Generated Mask
Auto-generated masks are produced for all samples. If the auto-generated masks are unsatisfactory, users can modify them using the built-in mask editor, or replace them with an externally generated mask by selecting the **Actions** dropdown, downloading the registered image, using that image to generate the external mask, and then uploading the external mask via the **Actions** dropdown. Supported formats for the external tissue mask are .tiff and .png.
### Product Type
Select the product type that matches the kit being used. The product type selection determines the active area where tissue should be located. If tissue extends outside the well or active area, a warning is displayed and a hatched overlay indicates areas outside the well boundary.
{% hint style="warning" %}
Including area outside the active area of your product may skew summary statistics. It is recommended to crop that area out with the crop to active area tool in the toolbar.
{% endhint %}
### Image Preview
The right side of the screen displays the tissue image with the detected mask overlay. The mask appears as a colored highlight over the tissue region.
#### Tissue mask editing tools
The toolbar on the right side provides tools for viewing and editing the tissue mask:
| Tool | Description |
| ----------------------- | -------------------------------------------------------------------------------------------------------------------- |
| Zoom in | Magnify the image. |
| Zoom out | Reduce magnification. |
| Show/hide mask | Toggle the mask overlay visibility. |
| Draw tool | Manually draw mask regions. |
| Erase tool | Remove mask regions. |
| Brush size | Adjusts the width of the paintbrush and eraser. |
| Show/hide well boundary | Displays hatching if image area is outside the active area of the product. |
| Crop boundary area | Cuts out the area that is outside the active area of the product. |
| Undo | Revert the last edit. |
| Reset | Reset to the auto-detected mask. |
| Brightness | Adjust image brightness. Note: this is just a tool for mask generation; edits will not appear in the exported image. |
| Contrast | Adjust image contrast. Note: this is just a tool for mask generation; edits will not appear in the exported image. |
### Review
Once you are satisfied with the mask for a sample, check the **Ready for analysis** box. This will lock the mask, so only do this once you have fully finished editing.
{% hint style="info" %}
If you do not want to include a sample for downstream analysis, leave the **Ready for analysis** box unchecked for the sample.
{% endhint %}
---
# Agent Instructions
This documentation is published with GitBook. GitBook is the documentation platform designed so that both humans and AI agents can read, navigate, and reason over technical content effectively. Learn more at gitbook.com.
## Querying This Documentation
If you need additional information that is not directly available in this page, you can query the documentation dynamically by asking a question.
Perform an HTTP GET request on the current page URL with the `ask` query parameter, and the optional `goal` query parameter:
```
GET https://help.connected.illumina.com/dragen-stratamap/illumina-stratamap-image-tool/image-processing/refine-tissue-masks.md?ask=&goal=
```
`ask` is the immediate question: it should be specific, self-contained, and written in natural language.
`goal` is optional and describes the broader end goal you are ultimately trying to accomplish on behalf of the user. GitBook uses it to tailor the answer towards what is most useful for that goal.
The response will contain a direct answer to the question and relevant excerpts and sources from the documentation.
Use this mechanism when the answer is not explicitly present in the current page, you need clarification or additional context, or you want to retrieve related documentation sections.